How to sell online courses from your own website, step by step
If you are wondering how to sell online courses from your own website, it comes down to three things: a site at your own address, a course area where only paying students can watch, and a checkout that pays into your own payment account. You can put these together from WordPress and plugins, use a course platform on your own domain, or use one system that does all of it.
Whichever you pick, check four things before you build, so that the site, the money and the student list really end up with you. This guide is for people with a first course or a clear idea for one, who want to sell it under their own name. It covers what to check, how the three setups differ in day-to-day work, and the order of steps from an empty site to the first paying student.
What "your own website" really means
Course tools like to promise that you own your audience. Whether that is true depends on details you can check in an afternoon, before you upload a single video. Ask these four questions of any setup, including ours:
- Does the course run at an address you own? A domain such as yourname.com, registered in your own name, stays yours if you change tools. An address like yourname.someplatform.com moves with the platform, and every link you have shared moves with it.
- Who is the seller, and where does the money land? Either buyers pay into your own payment account, or the platform sells the course in its own name and pays you later. The second model is called merchant of record: the platform is legally the seller, handles payment and usually sales tax, and the buyer is its customer first.
- Can you download your student list with email addresses? Look for an export of customers and orders as a CSV file, and try it once. If you can only message students inside the platform, they are not really your list.
- What happens to your students if you leave? Check whether you can export your content and customer data when you cancel, and until when. Students who paid you once should not have to buy again because you switched tools.
None of these is a reason to rule a tool out on its own. A merchant of record takes sales tax work off your hands, which some sellers want. The point is to choose it on purpose, not find out a year later.
Three ways to sell online courses from your own website
There are three common setups. They differ less in what the student sees than in what you put together at the start and what you keep looking after every month.
| You put together | You look after | Good fit if | |
|---|---|---|---|
| WordPress with a course plugin | Hosting, WordPress, course plugin, payment add-on | Updates, backups, caching, security | you already run WordPress |
| Course platform on your domain | Platform account, domain, payment account | Your site, email and community elsewhere | you only sell courses |
| All-in-one system | One account, domain, payment account | Content, marketing, plan limits | you want site, course and email together |
The three setups by the work they create, not by price. Costs depend on the plans you choose.
WordPress with a course plugin
You rent hosting, install WordPress, add a course plugin (an LMS, short for learning management system) and connect a payment add-on for Stripe or PayPal. This gives you the most control over design and data. In return you are the one who installs updates and fixes things when two plugins stop getting along.
One detail is easy to miss: caching plugins that speed up the site have to leave checkout, account and lesson pages alone, otherwise orders and logins break.
A course platform on your own domain
Hosted course platforms run the course area, video and checkout for you, and you connect your domain to them. There is nothing to install, so you can start on the course itself sooner. Check two things here: whether the platform sells as merchant of record or pays into your own account (question 2 above), and what else you need, because your main website, newsletter and community often stay in separate tools with separate bills.
An all-in-one system
All-in-one systems put the website, checkout, course, email and often a community under one login. For a course website, you still connect your own domain and your own payment account, but there is one customer list and one bill. The trade-off is that you work within the features the system has, so check that the ones you need are there before you move in.
Steps from course idea to first sale
The order matters more than the tool. It is easy to spend weeks on the website and only then find out whether anyone will pay. These steps put the questions with the biggest risk first.
- Make the course small
One result for one group of people, in five to eight short lessons. A narrow course is finished in weeks and easy to explain on a sales page.
- Check that people will pay
Talk to a handful of people from your audience, then offer the course to a waitlist at a launch price before it is finished.
- Set up the address
Pick a domain and connect it to your setup. Until launch, keep the site behind a password or a holding page.
- Write the sales page
Who it is for, what they can do afterwards, what is inside, the price, and how they get access.
- Connect payments
Connect your own payment account, set the price and buy the course once yourself.
- Give students access
Decide how students log in and what they see first, then send the link to your waitlist.
Write a sales page that answers the buyer's questions
A course sales page does not need to be long. It needs to answer what a buyer asks before paying: Is this for someone like me? What will I be able to do afterwards? What is inside, and how long will it take? What does it cost, and how do I get in? A short sample, such as a free lesson or a clip, answers the "is this any good" question better than any paragraph about yourself.
Connect payments to your own account
Card payments on your own site run through a payment provider such as Stripe or PayPal. Open the payment account in your own name, with your business details and bank account, and connect it to your site. That is what makes the money yours from the first sale: the payment provider pays out to your bank on its own schedule. On top of any platform fee, Stripe charges a fee for each payment, which depends on your country and the buyer's card.
Before you share the link, buy your own course once with a second email address and a real card. Check the purchase email and the login, then play every lesson on your phone and refund yourself.
The payment fees for this test usually stay with the providers, so the test costs a little money. Problems with emails and logins show up in this test, not when your first buyer writes to you.
Give students access without password trouble
Every extra step at login is a place where a student can get stuck. Some setups let students sign in with a code or a link sent to the email address they bought with. Whatever you use, write the login steps into the welcome email, so students know where to go before they need to ask.
Find your first students
Your own website brings no visitors by itself, so the first buyers come from people who already know you. Start with the waitlist from step 2, then tell past clients and customers personally. In online groups where your audience asks questions, answer them well and mention the course only where the rules allow it. A short free lesson or checklist in exchange for an email address keeps the people who are not ready to buy yet.
Ask for the student's email address at checkout and send a short welcome email right after the purchase. That email list is what you take with you if you ever change tools, so make sure it is part of your setup from day one.
How this works in Merchavio
Merchavio, which we build, is an all-in-one system: website, checkout, courses and email in one account. Here is how it answers the four questions from the start of this guide.
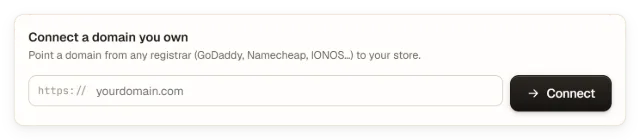
Your store has a free address at yourstore.merchavio.com, and you can connect your own domain in every plan. Open Storefront, then the Domains tab, enter the domain you bought at any registrar and click Connect. Set the two DNS records Merchavio shows at your registrar, then click Verify now. Merchavio takes care of the SSL certificate (step-by-step guide for your own domain).
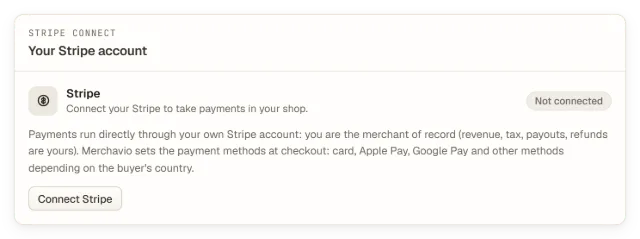
Merchavio is not a merchant of record. You connect your own Stripe account under Settings, Payments with Connect Stripe (how to connect Stripe). The first time, Merchavio asks for your name, business address and VAT status on a page called Ready to sell. Buyers pay straight into your Stripe account, and Merchavio's fee per sale is deducted with each payment. You are the seller, so sales tax or VAT is yours to handle; ask an accountant what applies to you.
The course itself is a product with lessons. Each lesson is a video: you upload it, or link it from YouTube or Vimeo. Video hosting is included from the Starter plan, where your videos can be played for up to 100 GB a month; during the five-day trial you can link videos, and uploading starts with a paid plan.
Students find their courses in your store's library and sign in with a 6-digit code or a sign-in link by email, so there is no password to forget.
Customers, orders and subscriptions can be exported as CSV at any time, and when you cancel your plan you can export them until the paid period ends.
Starter costs €19 a month plus 1.9% + €0.25 per sale, excluding VAT, with Stripe's fees on top. There are limits worth knowing: all lessons unlock at purchase (timed drip release is not available yet), and courses have no certificates. How the course area works in detail is on our page about Merchavio as a course platform. You can try it for five days without a credit card.
When a marketplace is the better start
If you have no audience, no email list and no time for marketing yet, a marketplace such as Udemy can be the easier first step, because people already search there.
The trade-off is that the marketplace keeps a share of each sale, and students buy from the marketplace, not from you. You can also use both: a short course on a marketplace to be found, and the full course on your own site for people who want to learn from you without Udemy in between.
Common mistakes when you sell courses on your own website
- Building the website before checking demand. A waitlist and a few presales tell you more than a finished design.
- Hosting lessons as unlisted YouTube videos. According to YouTube, anyone with the link can watch and reshare them.
- Skipping the test purchase. A broken welcome email or login costs you the first buyers, who are usually the most motivated ones.
- Not collecting email addresses. Without them you cannot announce your next course or tell students about a new lesson.
- Choosing a setup with no export. Check the customer export once at the start, not on the day you want to leave.
Frequently asked questions
How do I sell online courses from my own website?
You need a site at your own address, a course area that only paying students can open, and a checkout that pays into your own payment account. Set these up with WordPress and a course plugin, a course platform on your domain, or an all-in-one system. Then write a short sales page, buy the course once yourself to test it, and send the link to the people who asked for it.
Can I sell online courses on my own website without WordPress?
Yes. Hosted course platforms and all-in-one systems run the course area, video and checkout for you, and you connect your own domain. You do not need to install or update anything yourself.
Is it better to sell courses on Udemy or on your own website?
A marketplace like Udemy brings buyers who are already searching, but it keeps a share of each sale and the students buy from the marketplace. Your own website lets you set the price and keep the student list, but you bring the buyers yourself. Without any audience, a marketplace can be the easier first step.
How much does it cost to sell a course on your own website?
It depends on the setup. Expect a domain, a monthly fee for hosting or a platform, sometimes a fee per sale, and the payment provider's fee on every payment. Add up all the tools you need, including email, before you compare.
Do I own my students' email addresses on my own website?
Only if your setup lets you export them. Check that you can download customers and orders as a CSV file, and whether the platform or you are the seller of record.
How do students log in to a course on my website?
That depends on the tool. Common options are a password, or a code or link sent to the email address the student bought with. Put the login steps in the welcome email so students do not have to ask.
Storefront, checkout, courses, communities and back-office in one platform.